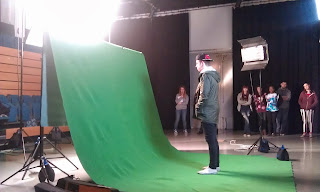
Today we had our first green screen induction which is really going to help me when it comes to the VFX module as I was planning on using it. In the past when I have looked at green screen it was a pop up one and did not work very well, in which there was fuzzy lines all around the person, so it was nice to see what it looks like professionally.
Green Screen Set Up
The green screen is quite easy to set up but does require a few people in order to be able to get it level. The green screen cloth itself lies across a pole which is attached to the top of two tripods, so that they can be raised or lowered. We then applied clamps to the top, or bull dog clips work just as well, to be able to hold it into place and we then adjusted the height so that it was just taller then the actor we were using.
Lighting Set Up
We then set up the lights that we were going to be using in the shot. We had an image already to work from in which we were going to be doing the green screen part for and this required us to have a lot of light coming from above and then some from the sides, as we took the first shot out on a balcony.
Scrims
A scrim is a square frame with fabric in the middle of it, called the silk even though it isn't made from it and just a generic fabric. We then set up another two tripods for the scrim to sit in between and attached them together with brackets that could be moved at will and titled onto different angles.
Lights
We then used large tungsten plug in lights for this shot, but at college we do have other options if we were going somewhere that doesn't have electricity like a rural location. We have small LED battery powered lights, which are usually used in animation, mainly used in stop motion, or we would have to take a generator out with us, and hope it lasts long enough to get all of the film footage.
When turning on lights you must remember to alert people of the fact that your doing it:
- You would first check no one is looking directly towards the light
- Then you would say loudly 'sparking' to let everyone know that the lights might go on
This is to ensure the safety of the crew and actors on set so that none gets there eyes damaged while looking at them. We then made sure the lights where above the scrim looking down at the scene so that the light projected nicely through it.
Scene Set Up
We then put our actor on the set and tested the lights, but because we were trying to get a correct effect, we had to turn the green screen around to create light from above and behind. We then used another two lights, kino lights, at the front to create a fill light, as our ones at the back were our main light source.
Previously we had taken some measurements of the camera height and measured how far away the actor needed to be from the railing that was in the other shot that we had taken previously. At this point we could have added another railing in, and then painted it, or covered it in green so that the actor could interact with it without it actually being there really. We then tries to get the fill lights on the correct settings so that we could get the best results from our green screen without getting any unnecessary shadows in shot.


No comments:
Post a Comment